Overview
Use cases for this Bike Geometry Calculator web app:
- Calculate frame geometry of an existing bike through simple XY measurements.
- Calculate a full chart from the often sparse geometry chart provided by the manufacturer.
- Compare and/or match fit of two bikes.
- Test size and fit of a frame before buying.
- Test how fit is affected by adjusting or changing components.
The app is made for recording and comparing bike fits and frame geometries, it's not designed to make bike fits based on body measurements (which is a bad idea anyway, as good bike fits are made using dynamic evaluations).
How to use
- Toggle different sets of measurements by pressing the buttons on the top row.
- Edit a measurement by tapping on its number. When editing, all other measurements will automatically adapt to match.
- When making a measurement or comparing, carefully note exactly where the measurement start and end in the chart (for example if it's the top, back or center of a tube).
- Tap on the title to change name of the chart.
- Shadow bike: press the button to enable the shadow bike (=an extra bike) to make visual comparisons. No measurements are shown for the shadow bike, but you can swap it to the front any time by pressing "Swap Bikes".
- The current state is stored in the browser URL (link) so to share the chart just copy and share the URL.
- Use the Undo button for reverting edits (or imports). There are unlimited amount of undo steps.
- Have this help column visible while working to make it easy to follow the documented workflows for measuring a bike or copying a geometry chart.
- While the app works on small mobile phone screens, it's best experienced on a tablet or desktop. On small screens you need to use page zoom.
Function reference
Measurements buttons
The measurement buttons are toggle buttons, red = off, green = on. Each button enables a set of measurements, and several can be combined although the chart can become a bit crowded.
- Measure: shows measurements to enter to make a complete measurement of an existing bike. How to do this is described in the "measuring a bike" section.
- Frame Geometry: measurements related to frame and fork.
- Components: measurements related to the components added to the frame.
- Bike Fit: measurements that are interesting in a bike fit context.
- Quick Fit: a few measurements to quickly compare the fit of two similar bikes. Assumes that bottom bracket drop and handlebar diameter is the same between compared bikes. Head tube angle and fork rake should also be reasonably similar.
- Fit Delta: only enabled if the shadow bike is active, and then it shows the fit difference between the two bikes.
- Extra: a special button that toggles related extra measurements for the currently active measurements.
Geometry control buttons
- Fork: choose if changes to fork should rotate the whole frame (as it would in reality), or if the head tube angle should be fixed (which is the default as it's generally more practical).
- Head Tube: choose if changes to head tube length should expand/shrink up (fixed bottom) or down (fixed top). Fixed top is the default and most practical while measuring a bike.
- Anchor: when the shadow bike is enabled choose which point to use as reference (that is where the bike should be aligned), default is the bottom bracket.
Function buttons
- Shadow Bike: enable the shadow bike (an extra bike to compare with), which will show up as dashed chart. If there is no shadow bike already, a copy of the current is made.
- Swap Bikes: swap the main bike and the shadow bike. If there is no shadow bike already, a copy of the current is made.
- Undo: undo the last measurement edit (or import). The full history of edits is kept so you can undo until the starting point.
- Export|Import: bring up a dialog to export/import/edit measurements as text, or import measurements from an URL.
- Text dialog: key measurements of the main bike is shown as text (in JSON format). This can be saved to file (Save button), or copied to the clipboard (Copy button). The measurements in the dialog will be applied on the chart when the dialog is closed, so if the measurements are changed (by hand edit, or Load from file, or Clear and pasted from the clipboard) before closing the dialog (Close button) the chart is updated accordingly. Any missing measurement is derived automatically. If a measurement cannot be derived a default value is used. If the dialog contents is invalid, no changes are made.
- Import from URL dialog: paste a bike geometry calculator URL into the dialog and choose to import the main or shadow bike (if available) from it. The imported bike is stored as the main bike, so to import shadow to shadow swap bikes before importing.
- Reset: choose between resetting all measurements (to a default example bike) or removing the shadow bike (if any). As both the main and the shadow bike is stored in the URL, removing the shadow bike will make it much shorter.
- Fullscreen: toggle full screen mode. Note that it typically disables the ability to zoom the page, so on very small screens it may be better to not run fullscreen.
- Help: toggle side panel with this documentation.
Demarcations
- Only intended for drop bar bikes.
- Seat stays and down tube are not editable as they are not relevant for fit or handling.
- Front and rear wheel is assumed to be of the same diameter.
- The handlebar shape has been excluded and thus the position in the drops cannot be specified.
Measuring a bike
To measure an existing bike, take it inside and put the rear wheel to a wall and hold it exactly upright with a bike stand, trainer or just some furniture. The floor and rear wall will serve as perpendicular reference planes when measuring.
For measuring tools get a measuring stick or a stiff folding rule, and a bubble level (see the measuring technique section for additional tips).
Enable only the Measure button to show the XY measurements with the wall and floor, and start measuring. It will be easier if you do things in a certain order:
- Inflate the tires and make sure that the vertical height of the front and rear hub is exactly the same. Add spacing under the tire of the lower hub if necessary. Enter the resulting hub Y.
- Measure back hub X and offset X (that is how much the tire is off the wall, if any).
- This will indirectly set the wheel radius, which is defined as the outer radius of the wheel including the inflated tire, without any compression from the weight of the bike.
- As the tire is compressed a little from the bike weight, hub Y is typically a few mm less than back hub X if the tire touches the floor and wall.
- Measure/estimate offset Y, which represents the ground level.
- Offset Y is only used to calculate how high the pedal axle and bottom bracket is off the ground when riding. If the bike is mounted on a trainer the tires float above the ground and needs compensation. Hub Y minus offset Y should be the hub height when the bike is ridden. If you want conservative numbers for that, estimate how much extra the tires are compressed when riding and add the corresponding to the offset.
- As the wheel is drawn as a perfect circle in the chart it's normal that the tire can drop a few mm below offset Y (or the floor line).
- Measure saddle length, saddle front to center, and measure/estimate saddle angle.
- Measure/estimate stem angle (often printed on the stem).
- Measure handlebar diameter (31.8 mm on most bikes).
- Measure crank length (often printed on the cranks).
- Measure bottom bracket X/Y.
- Measure seat tube top center X/Y.
- Measure head tube top center X/Y.
- The head tube and fork is tricky. Here's why: while you can measure head tube bottom X/Y, the distance is too short to safely get an accurate head tube angle. Wheel base is easy to measure accurately though, but we need fork rake, which is hard to measure. Here's a couple of methods to go forward:
- Method A: if you can get the fork rake in advance:
- Measure head tube length.
- Measure headset bottom stack, headset is often invisible on modern bikes, but there's usually a 1mm gap or so.
- Enter fork rake.
- Measure front hub X.
- Method B: measure head tube bottom center but use it only as a guide and adapt to other known data.
- Measure head tube bottom center X/Y. Sanity check that head tube length matches.
- Measure headset bottom stack.
- Adapt fork rake with trial and error until front hub X matches the measured value. Sanity check the resulting fork rake, for most road bikes it should be in the range 40 to 50mm.
- Method A: if you can get the fork rake in advance:
- Measure handlebar back X and handlebar top Y.
- Now with handlebar position established, we want to check that stem length, stem angle, stem stack, headset spacers stack and headset top stack all match up.
- The stacks can easily be measured. If you don't have the stem angle, you can adjust it until all matches up.
- In the chart the stem is anchored in the middle of the stem stack. Some real stems are not, so you may need to use a fake stem stack to get the stem aligned properly.
- Note that when you change the stack and stem angle values the handlebar position will move, so when finished check that it is where it should be.
- Measure hoods rest top X/Y.
- Measure saddle back X and saddle top Y.
- Measure saddle stack and measure/estimate seatpost setback.
- Adjust top tube position to match the real frame with seat tube top to top tube center and head tube top to top tube center measurements.
The bike is now fully measured, and you can enjoy all automatically derived measurements. It's a good idea to go over some derived measurements, like top tube length, and see that they match to double-check the accuarcy of the measurements.
The measured chart usually does not exactly match a geometry chart from the manufacturer. While this can be due to measurement errors, it's also likely that the manufacturer has rounded some values (like tube angles) or measured with slightly different anchor points. A different headset or fork can also affect frame rotation and thus yield different angles.
Measuring technique
Below follows a few tips on how to make accurate measurements.
Use a bubble level
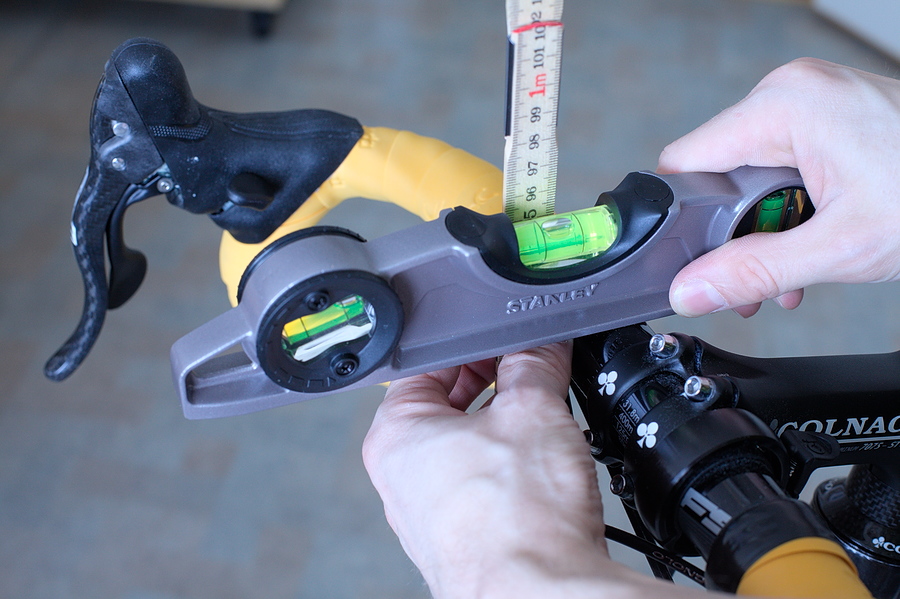
If the ruler cannot be held directly against the point measured, use a bubble level to make sure you get the measurement exactly at the accurate height. In the image the measurement cannot be seen until the bubble level is removed, so we place and hold a fingernail exactly where the bubble level and ruler meet. Of course, we also take care to avoid bending the ruler and make sure to hold it perfectly vertical (using a bubble level for that is generally overkill though, just use gravity).
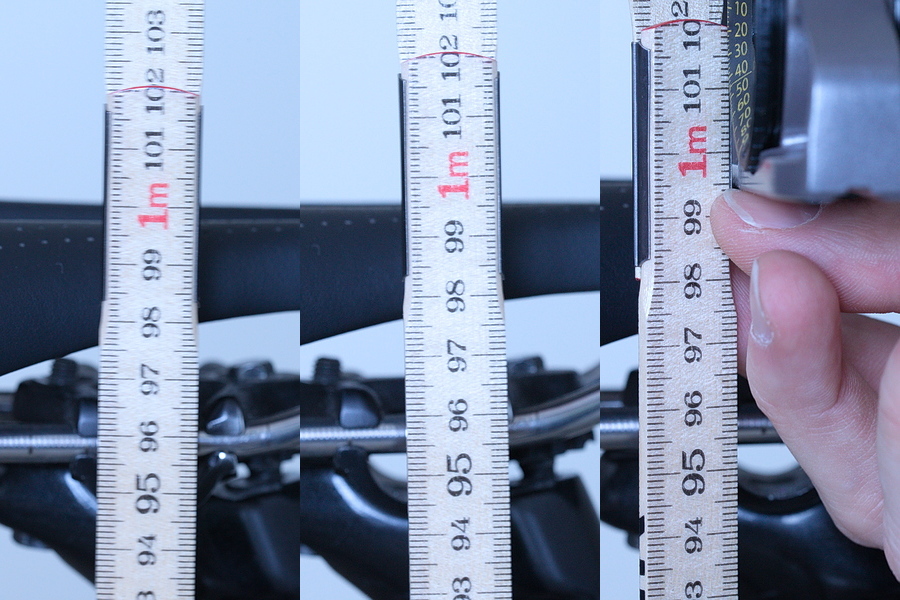
The three images above show what can happen if a bubble level is not used, here when measuring saddle top Y. The ruler is placed the same way in all three images, but in the first two we look by eye from the side, and due to the ruler is some distance away from the saddle (as there's no room to put it directly against while still having it vertical) and the saddle top is rounded, the result depends on from which height we look at the ruler. The first looks like 998mm, the second 996. In the third image we use a bubble level and put a fingernail where it meets the ruler, and there we get an accurate measurement (994mm).
Derive measurements
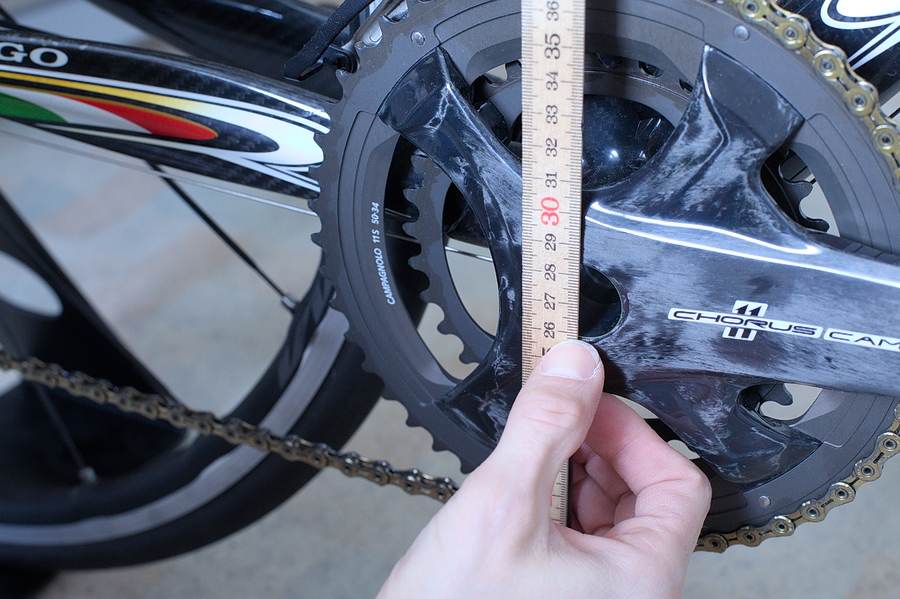
Sometimes deriving a measurement is more accurate than trying to measure directly. The example above shows when there is a hollow crank axle so there is no clear center point of the bottom bracket. We then measure to the edge of the hole, which the ruler can be put directly against, to get an accurate measurement. Then we measure the diameter of the hole using a vernier caliper or a ruler, and add the radius to get the bottom bracket center measurement.
Tube centers
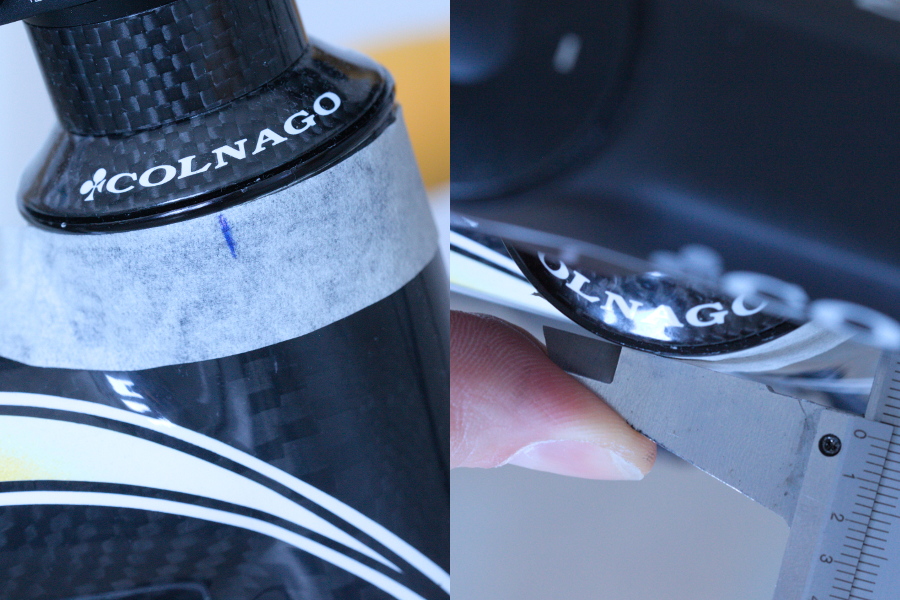
It can be helpful to put some masking tape on the tube ends and make a pen mark at the center to have something to aim at when measuring. Looking from above the head tube / seat tube centers can be seen by eye, a vernier caliper can be used to get additional visual guidance where to put the pen mark.
Hoods reach
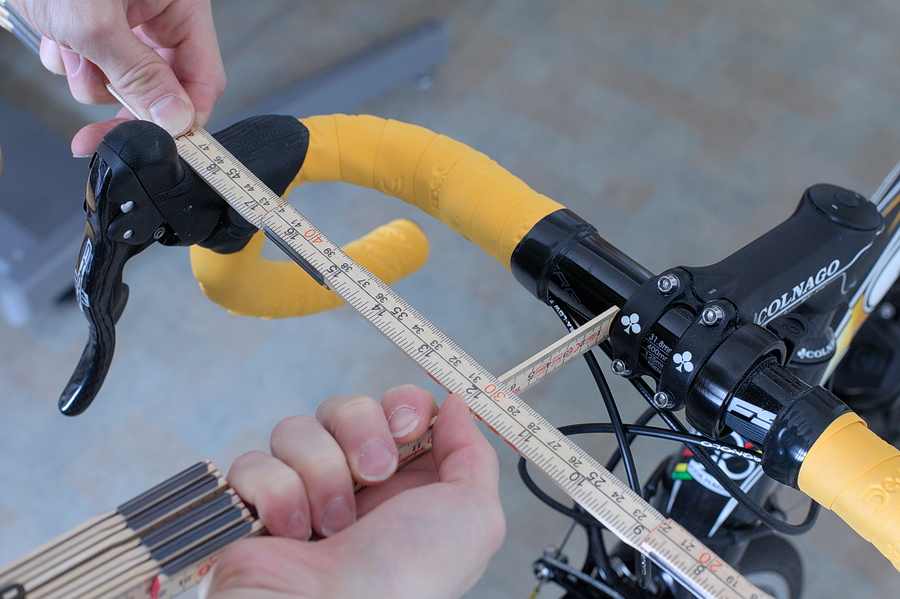
If you measure a complete bike you normally measure hoods reach just by measuring the hoods XY coordinate. However if you want to measure it separately, here's how: the image shows a technique with two rulers, one is put over the hoods where the purlicue rests, and the other is used for measuring the distance to the front of the handlebar. A fingernail is placed and held exactly where they meet so we can remove the ruler and see the result. Then radius of the handlebar is added (usually 16 mm) to get the final measurement.
Copying a geometry chart
Manufacturers' geometry charts often lack crucial measurements, and many times the charts are poorly or incorrectly drawn so it's not clear between which points the measurements are made. Sometimes you need additional information to be able to make a complete chart, or you have to live with that some measurements are not known.
Due to the large variability in chart quality and content a step-by-step guide how to copy a chart will not work for all. However if the chart indeed is detailed, here's a suggested order to copy the measurements:
- Seat tube angle
- Head tube angle
- Bottom bracket drop
- Chainstay length
- Fork rake
- Stack
- Reach
- Head tube length
As the bike needs to stay connected when changing a measurement, some related measurements will automatically change, but if you use the order above all those measurements will stay at the value entered. If you need to use a different order or other measurements you may need to revisit old measurements to see that they are still the same.
When copying or editing geometry charts it's often useful to change the geometry control "Head Tube: Fixed Top" to "Head Tube: Fixed Bottom".
Here follows some general tips how to deal with charts that are less detailed:
- Even if many measurements are missing you can often derive some or all of them. It can be fruitful to search the web for additional information.
- If your purpose of making the chart is just to compare bike sizing before buying, you can skip measurements which is not important for that purpose, like fork rake. Measurements you do need for bike sizing:
- Seat tube angle, as that will affect how far back the saddle moves with height adjustment.
- Head tube angle, as that will affect how close the handlebar comes with height adjustment. It's less important to have the correct value than the seat tube angle though, as the effect is much smaller. So if you don't have it, guess it.
- A way to know where the head tube top center is in relation to the bottom bracket. Stack and reach measurements are excellent, but it may also be derived from seat tube length and horizontal top tube length or similar.
- Rough measurements to sanity check standover height and seatpost extension.
- If the fork is pre-cut to a length, you need to know how much stack above the headtube you get. In this case making an estimate from a photo is often the only option.
- If you don't plan to change stem and handlebar you need to get data on those (length, angle, reach).
- Sanity-check crank length. Usually it has no effect on sizing, but if you buy some odd bike the crank length may not be what you expect.
- While fork is usually not included in the chart, it is important as the length of it decides where the head tube starts. Often you can derive it though, for example by having stack and head tube length.
- In traditional sizing head tube length was what decided the stack height, as forks always had (almost) the same length. Today fork lengths can differ widely, especially with endurance/cross/gravel bikes so you need to know more than just the head tube length.
- Horizontal/effective top tube can be measured in different ways, and it's not always clear how the manufacturer have measured it. If seat tube and head tube angles differ significantly, then exactly where horizontal top tube is measured will affect its length. If there is a reach measurement it's usually better to rely on that.
- Stack and reach are modern measurements, and if available they are usually measured at the expected places and are correct.
- Stack and reach is the modern counterpart to top tube and head tube length for bike sizing. Note that you still need seat tube angle and preferably head tube angle as well to be able to make a chart for reliable sizing.
© Copyright 2018, 2020, 2023 — Anders Torger.